Wednesday, January 30, 2013

Abstract Photo Manipulation In Photoshop


Step 1

Open Photoshop and create a new document. I am using 2880x1800 pixels for mine After that let's use a photo of a beautiful girl. The one I am using is from YuriyZhuravov and it's title Beautiful smiling woman portrait on white background. Courtesy of Shutterstock.
Abstract Photo Manipulation in Photoshop CS 6

Step 2

Now let's create some brushes to use for our masking exercise. The images I am using to create the brushes are also courtesy of Shutterstock and this first one is called "inks in water, colorful abstraction" byADA_photo.
Abstract Photo Manipulation in Photoshop CS 6

Step 3

Copy some parts of the previous image and paste in a new document. After that go to Edit>Define Brush. Add a name to your new brush and create a few more.
Abstract Photo Manipulation in Photoshop CS 6

Step 4

Here's the second one, simply do the same thing as the previous step.
Abstract Photo Manipulation in Photoshop CS 6

Step 5

Now using a different image, this one from NatUlrich called Ink in water. Isolated on white background.Again copy a few parts to create different brushes. I created 4 brushes for my image.
Abstract Photo Manipulation in Photoshop CS 6

Step 6

Select the image layer and group it so the image will be in a folder. Duplicate this folder a few times because we will need it as we move forward. Hide all new folders and keep only one visible. Select the visible folder and go to Layer>Layer Mask>Hide All. The image will be completely hidden. After that select the Brush Tool (B) and one of the brushes you created from the stock photos. Using white for the color, paint on top of the layer mask to make part of the girl visible.
Abstract Photo Manipulation in Photoshop CS 6

Step 7

Let's add some layer styles. I am using Inner Shadow, Inner Glow and Drop Shadow to create some depth for the different layers. You can see the values below.
Abstract Photo Manipulation in Photoshop CS 6

Step 8

Select one of the hidden folders and make it visible. Apply the same process as we did in the previous steps to add another layer of our abstract collage.
Abstract Photo Manipulation in Photoshop CS 6

Step 9

Add a new layer inside the folder and group this new layer as well. Change the Blend Mode to Color Burn. Select the layer again and change the opacity to 30%. Using the Brush Tool (B) with black for the color and a very soft brush, start painting a sort of shadow on the overlaping areas. The idea here is to add more depth and separate the parts a little bit more.
Abstract Photo Manipulation in Photoshop CS 6

Step 10

Add more parts by repeating the same process. Every new part you should use a new folder with the image and the color burn folder.
Abstract Photo Manipulation in Photoshop CS 6

Step 11

Use different brushes and different sizes to make the image more dynamic.
Abstract Photo Manipulation in Photoshop CS 6

Step 12

Here is the final version of my layers. Notice that there's always a shadow between layers and the bottom one is different than the others. Try to vary as much as you can to make the effect more real.
Abstract Photo Manipulation in Photoshop CS 6

Step 13

Select all layers and duplicate them. After that merge all new layers into one. Go to Filter>Blur>Iris Blur. The Iris Blur is pretty cool because we have a real time preview. So move the blur around until you get something like the image below. The goal is to blur the edges a little bit.
Abstract Photo Manipulation in Photoshop CS 6

Conclusion

Duplicate the layer and apply change the Blend Mode to Soft Light at 70% Opacity. Also duplicate it again and apply a Gaussian Blur with 10 pixels Radius. Change the Blend Mode to Screen at 40% Opacity. In the end you can apply a Photo Filter as well to make the colors match a little bit more.
Now you can try with different images, brushes and colors. Remember, the tutorials are more to illustrate the process, try to come up with your own images.
Abstract Photo Manipulation in Photoshop CS 6

Create a Wicked-Worn Vintage Pop Art Design


Step 1

Let’s get started with the background. First we need an old and dirty piece of paper. You don’t even need to buy stock photos to get the textures. One of the advantages of vintage design is the easy way to get the textures. You can scan or take a picture of one of your notebook’s sheets.
Basically, you can work with the most handy material. We’ll start using this image, create a new document 768 pixels by 1024 pixels. Then extract the paper sheet removing the white background and paste it into a new layer above a dark fill Layer.

Step 2

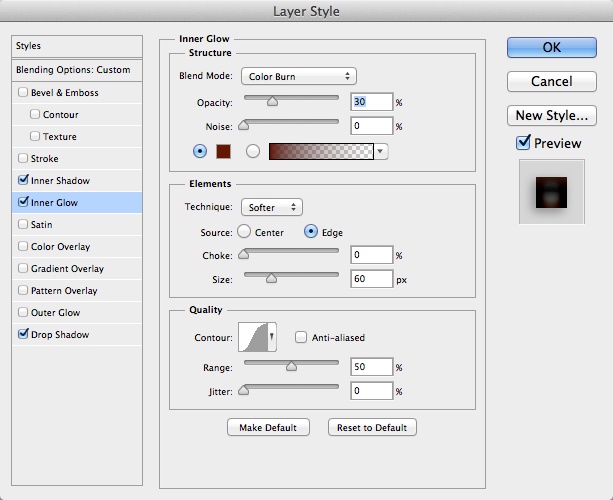
This is an easy trick to add a dirty style to the paper. Create a new layer named "clouds" above the "paper" layer. Select the default foreground and background colors by pressing (D), then go to Filter > Render > Clouds. Then using a huge eraser tool (180px Size with a Hardness of 0%), delete some areas of the clouds. Finally, change the "clouds" layer Blending mode to Color Burn and Opacity to 75%.

Step 3

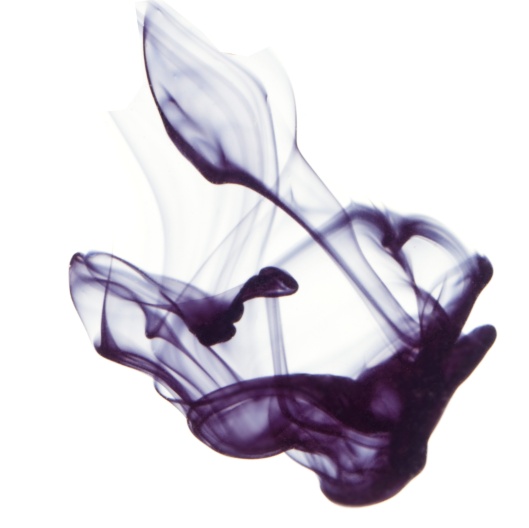
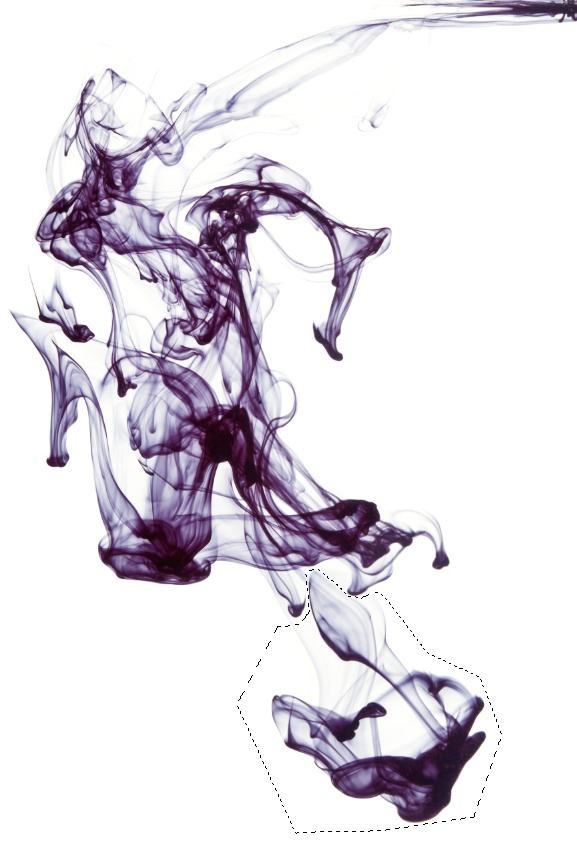
Now we’ll start adding some elements to our design. Usually I add the background images first and the main image last, but this time I’ll start with the main image. I’ll tell you why a few steps forward. Paste this image of a guy reading a book. Then delete all the white background using the Lasso tool and place the image somewhere at bottom-right.

Step 4

As Pop Art can be bizarre sometimes, which is fun, we’ll add a dog’s head to our reading man. Add a Layer Mask > Reveal All to the "Reading Man" layer. Then using a soft black brush, hide the man’s head. Also, paste this image of a dog’s head anywhere. Then using the Magic Wand, delete all the white background of the picture. Finally, using a soft eraser tool, round the neck area just a little bit.

Step 5

Place the dog’s head over the neck of our reading man, and hide the "Dog Head" layer for a while. Then using the Lasso Tool, select and copy some parts of man’s suit and shirt, also a little bit of the man’s hair, then paste the selection above the "Dog Head" layer. Erase some tiny areas of the dog’s neck to make it fit right into the shirt. If you need to, use the Warp Transformation to fit the dog’s head on the man correctly.

Step 6

Erase the dog’s neck to make the join softer, then press Command + U to adjust the Hue/Saturation to match the man’s hair colors.

Step 7

Put "Reading Man", "Dog Head", and the tiny shirt selection layers into a new folder. Then convert the folder into a new Smart Object and name it "Man-Dog," or a name you prefer.

Step 8

Now, select the "Man-Dog" Smart Object. Then using some guides, place the book in the middle of the design. Then duplicate the Smart Object. Also, apply a Motion Blur angle of 0ยบ, a Distance of 50px, and place the layer below the original
Change the "Man-Dog copy" Blending Mode to "Color Burn" and set the layer’s Opacity to 25%. Next set the "Man-Dog" layer Blending Mode to Hard Light. Finally, Move the "Clouds" layer above all the layers in layer’s palette.

Step 9

Now we’ll draw a Sunburst Custom Shape, I downloaded this one from here. Try to keep the book area clear. Rasterize the shape by clicking on Layer > Rasterize > Shape. Then change the layer Blending mode to Overlay and set the Opacity to 75%.

Step 10

Now, this is an important step. Usually doing something like fixing the overlay of the sunburst over the man-dog would be simple, just move the "Sunburst" layer below the "Man-Dog" layer, but this time we cannot do that because the "Man-Dog" layer has a particular Blending mode applied to the paper background.
So we’ll Command-Click the "Man-Dog" layer’s miniature to make a selection. Then select the "Sunburst" layer and delete the selection. Also, to add a more grungy looking to the stripes, apply a new Layer Mask > Reveal All to the "Sunburst" layer. Then using some splatter brushes (with Opacity at 80%, Flow at 80%, and Color of black), draw a few random black splatters in the layer mask.

Step 11

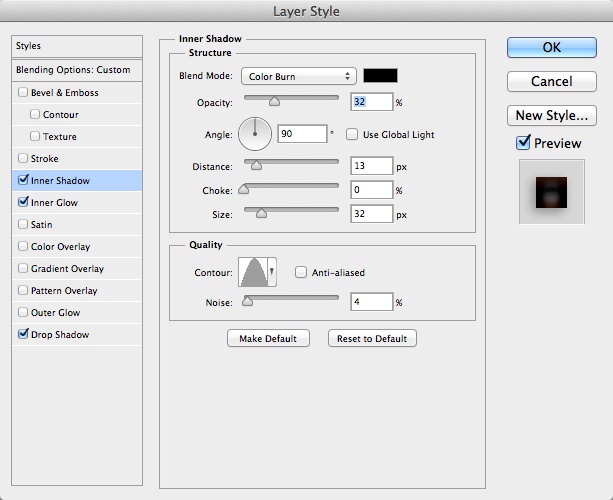
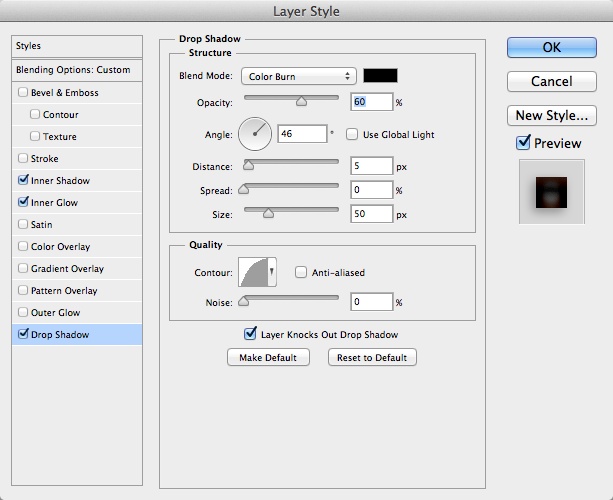
Give the "Man-Dog" layer a Drop Shadow Spread of 0% and a Distance of 15px.

Step 12

We’ll add some patterns to our design, I found this nice wallpaper that we can use first. I’ll explain this step quickly. Create a new document with a size of 50 px by 50 px, and paste the image as you see below. Then go to Edit > Define Pattern and save it with a name.
Back to our main document, draw a Rectangle (shape or selection) into a new layer above the "Clouds layer" and name it "Texture 1". Then fill it with any color and go to Effects > Pattern overlay. Find the pattern we just saved and press OK.
Then you’ll need to rasterize the pattern, for this create a new blank layer above the "Texture 1" layer, then merge both layers by selecting both and pressing Command + E. Finally, using the Sponge Tool, Desaturate some areas of the rasterized pattern.

Step 13

Now, apply a Layer Mask > Hide All to the "Texture 1" layer. Then using a 50px white Brush with a Hardness of 100%, draw a shape to make some areas of the pattern visible. It doesn’t matter if you cover a bit of the man’s layer, as we’ll be using layer masks to keep things flexible. This way it’s easy to move back if we don’t like what we’ve been doing. I also deleted the big red spot over the man-dog head using the Clone Tool; this was done over the "Paper" layer.

Step 14

Command-Click the "Man-dog" layer miniature to make a selection of the man’s shape. Now, carefully click the "Texture 1" Layer Mask miniature. Select the Fill Tool, set the foreground color as black, and fill the selection. Remember you’re filling the layer mask. Finally change the "Texture 1" Blending mode to Multiply.

Step 15

We’ll add another pattern to the design, I found some nice retro curves over here. To convert them into a repeating pattern, I just crop a 50px by 50px square from the original picture, then just repeat Step 12 of this tutorial (apply the Pattern Overlay to a rectangle, Merge the image, and Desaturate some areas using the Sponge Tool).

Step 16

Apply a Layer Mask > Hide all to "Texture 2" layer, then using the same 50px white brush, paint some random zones of the layer mask.

Step 17

Command-Click the "Man-Dog" layer and make a selection. Then fill that selection into the "Texture 2" Layer Mask just as we did in Step 14.

Step 18

Change the "Texture 2" layer Blending mode to Multiply. There’s an awful overlay with the "Texture 1" layer. To fix this, Command-Click the "Texture 2" Layer Mask on the Layers Palette to make a selection of the mask shape. Then click the "Texture 1" Layer Mask, and using the Fill Tool (Black foreground), fill the selection. To finish this step, select the "Texture 2" layer and apply a Color Overlay effect using the values at bottom of the following image. You can add more shapes and patterns if you want as well.

Step 19

The hard work is almost done! Now, grab this image, cut and paste some inspiring text from it, and paste them anywhere in the document. Then you can Free Transform each one to place them into a nice position. Apply a Drop Shadow effect to each work using the values shown below. Also, adjust the Hue/Saturation of each word using the following values as well.

Step 20

We’ll be adding some text to our design shortly, but first we need to paste some pieces of worn paper. I used these three pieces: onetwothree.
Use an irregular Eraser Tool to delete some areas of the paper sheets to give them a torn effect, apply a Drop Shadow style to each paper layer using the values shown below. Finally, burn some areas of the paper pieces using the Burn Tool.

Step 21

Now add some letters above the paper pieces, use any random font, but set every text layer Blending mode to Vivid Light.

Step 22

Now add some text over the background paper, I used a Grunge font called Bleeding Cowboys, set the text layer’s Blending mode to Overlay, and duplicate it to make a strong Overlay.

Conclusion

That’s it! A simple, easy, and quick way to create a vintage pop art design. This tutorial is only a basic guide on this subject. You can create your very own pieces of vintage pop art using similar techniques. I hope you find this tutorial useful.

Creating an Awesome Retro Collage


Creating an Awesome Retro Collage

In this complex and long tutorial, we will be making this abstract photo collage. Lots of images are used with exciting effects. Along the way, you will be using different blend modes, filters and some advanced adjustment layer techniques.
 
Preview of Final Image
 
 
Preparations
First, you may want to download all the 14 photos we will be using here. You will notice that most of these photos are extremely versatile and surely you will find them of great use in other projects.
Paper TextureSkyGirlLadyBirdViolinKeyboardRobotSoldierTreeColor DropsTankLotus. Please note that the Zebra used in this tutorial is NOT a stock. The image is copyrighted by CaptBogart.
 
And we are ready to begin. Start by creating a new layer . Give it a size of about 16x 12 cm and bring in the Paper Texture and adjust its size to that it fits the canvas.
 
 
Bring in the Sky photo and paste it over the paper texture. Give it opacity of about 30% .
 
 
Now let us bring in the Girl. Extract her from the background and paste into the document. We only need the top part of her body to be visible.
 
 
Let’s add the objects behind. Start from the left with the lovely vintage Lady. After you got her set into place, take the Polygonal Lasso tool and draw a brief rectangle over her eyes (or you can simply create a rectangle and rotate it using the Transform tool). Next just get the Eraser tool and click twice so that you make the two holes for her eyes.


Moving on for the colorful Bird to enter the scene. Extract it from its background. Download watercolor brushes from Bittbox. Ctrl + left click on the bird layer so that you get it selected, create a new layer and start painting it using different types and colors of watercolor brushe. Feel free to experiment on this part.
 
 
Duplicate the layer created previously. Drag the original bird layer to be just between those two layers and change its opacity to 60% Select the top bird layer from and change its blend mode to Pin Light.
 
 
Adjust its size and just place it behind the girl as shown below.
 
 
Before we can add the rest of the objects, let’s make the violin first. Extract the violin from its background and fill it with black.
 
 
Bring in the keyboard photo. Change its size, rotate it with the Free Transform tool and set it in position on top of the violin. CTRL + left click on the violin layer to select it. Next, hit Shift + Ctrl + I to inverse the selection and with the keyboard layer selected, hit the Delete key.
 
 
Arrange the violin behind the girl nicely and start placing in the rest of the objects. Free transform all of them and rotate them until you have something similar mine below.
 
 
Let us proceed to work on the background. Open up the Tree and the Color Drops images. Resize the Color Drops layer and place it on top of the Tree. Change its Blend Mode to Hue.
 
 
Arrange the Tree behind all the central objects and reduce its Opacity to 20%.
 
 
Create a white circle just on top of the Tree layer. Reduce the Fill to 0 and then perform these settings in the Layer Styles panel.
 
 
Duplicate the circle and arrange both circles so that you end up with something looking like this.
 
 
Create another 4 new bigger circles using the same technique and arrange them in the back. We want these circles to be very subtle so reduce their opacity to about 10%.
 
 
Bring in the Lotus flower. Reduce its size, duplicate it twice and arrange them around the right circle. Also change their Blend Mode to Soft Light.
 
 
It is time for the pink Tank to enter the scene. Extract it from its background and delete the two rear wheels.
 
 
Go to Layer Styles and apply the following settings.
 
 
Repeat this procedure you used for the flowers. Reduce the size, duplicate it twice. But instead of changing its Blend Mode, just reduce the Opacity to 40%.
 
 
Press Shift + Ctrl + Alt + E to create a new layer from all the layers that are visible. Now with this new layer selected go to Filter > Blur > Motion Blur and apply the settings below.
 
 
Go to Image > Adjustments > Levels and apply these settings. Change the Blend Mode of this layer to Soft Light.
 
 
Now all we need to do is just make this blur layer a bit bigger and erase its bottom part. We start by pressing Ctrl + T on your keyboard and change the size of the layer. Next get the Eraser tool and using a Soft Brush type, just erase the bottom half


We are ready for the final touches. Pick your Curves Adjustments Layer and get ready for some old fashion cross processing effect. Just use these settings and reduce the opacity of the final Curves layer to about 45%.


Create a new Hue/Saturation Adjustment Layer and apply these settings.
 
 
In order to have more focus to the centre of the layout we will change the color of the Girl’s lips. So create a new layer, get a Soft Brush and start painting a bright red on top of her lips. Adjust the opacity of this layer to about 50%.
 
 
Create a new layer and pick a Rounded Soft Brush of a large size (around 200px). With black as your default color, start brushing around the edges of the canvas. Change the Opacity to about 60% and Blend Mode to Soft Light.


And you are done! Feel free to play with some more adjustment layers until you get the best result. Another thing you can do is to add another dimension to the background with an interesting pattern. I decided to test one found at Brusheezy. Hope you found this tutorial inspiring and see you again next time!